
Find resources:
Loading
Answer
Our name label background images (such as these) are sets of resizable images (picture files) which are designed to allow you to change the size of them before adding text above and printing to suit your needs. You will need a good word processor or desktop publishing program such as Microsoft Publisher, Microsoft Word or Open Office (which can be downloaded free from here).
Below are instructions for using Microsoft Word, Microsoft Publisher and Open Office to resize the label background images for your purposes, and then add text (such as pupil names) above them.
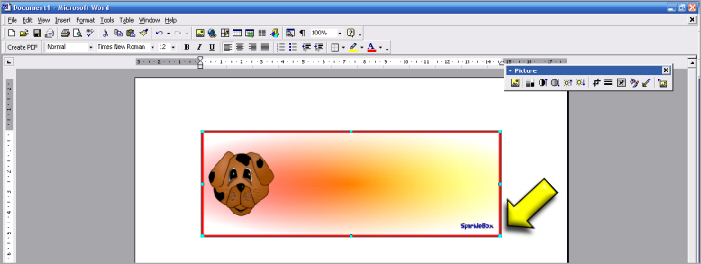
6. Click on the image and use the ‘handles’ (indicated by the yellow arrow above) to resize the label image to the size you want.
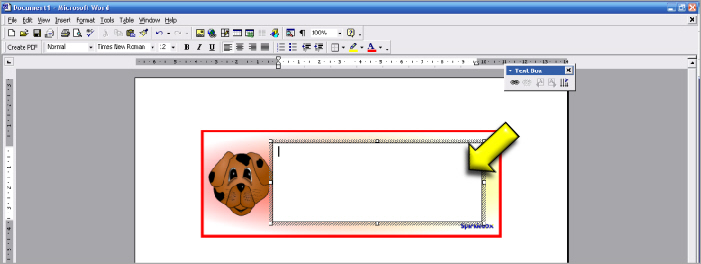
7. Next, click the ‘Insert’ menu and select ‘Text box’. Then drag a new text box above the label background as shown below:
7. Next, click the ‘Insert’ menu and select ‘Text box’. Then drag a new text box above the label background as shown below:
Using Microsoft Word
(This may differ slightly depending on which version you are using).
1. Ensure that the images are fully ‘extracted’ from the ZIP that you downloaded them in. (Click here for more help with this).
2. Open a new blank document in Word.
3. Click the ‘Insert’ menu and select ‘Picture’ and then ‘From file...’.
4. Locate the images on your computer and select one. Then click the ‘Insert’ or ‘OK’ button.
5. The image will appear in your Word document, ready to be resized (see example below).
Using Microsoft Publisher
(This may differ slightly depending on which version you are using).
1. Ensure that the images are fully ‘extracted’ from the ZIP that you downloaded them in. (Click here for more help with this).
2. Open a new blank publication in Publisher.
3. Click the ‘Insert’ menu and select ‘Picture’ and then ‘From file...’.
4. Locate the images on your computer and select one. Then click the ‘Insert’ or ‘OK’ button.
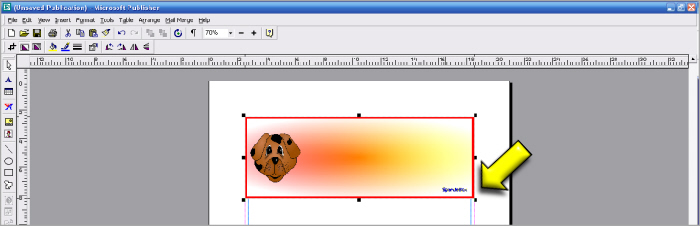
5. The image will appear in your publication, ready to be resized (see example below).
(This may differ slightly depending on which version you are using).
1. Ensure that the images are fully ‘extracted’ from the ZIP that you downloaded them in. (Click here for more help with this).
2. Open a new blank publication in Publisher.
3. Click the ‘Insert’ menu and select ‘Picture’ and then ‘From file...’.
4. Locate the images on your computer and select one. Then click the ‘Insert’ or ‘OK’ button.
5. The image will appear in your publication, ready to be resized (see example below).
Using Open Office (download free from http://download.openoffice.org/)
(This may differ slightly depending on which version you are using).
1. Ensure that the images are fully ‘extracted’ from the ZIP that you downloaded them in. (Click here for more help with this).
2. Open a new blank publication in Open Office Writer.
3. Click the ‘Insert’ menu and select ‘Picture’ and then ‘From file...’.
4. Locate the images on your computer and select one. Then click the ‘Insert’ or ‘OK’ button.
5. The image will appear in your publication, ready to be resized (see example below).
8. Now right-click on the greyed edge of the text box and select ‘Format text box...’.
9. Using the drop-down options in the menu that follows, change the fill colour to ‘No Fill’ and the line to ‘No Line’ and click ‘OK’.
10. The text box will now be transparent. You can simply type in the relevant pupil name and alter the size etc. of the font to suit your needs.
11. You can add more labels on the page in the same way.
11. You can add more labels on the page in the same way.

8. Now right-click in the text frame and select ‘Change Frame’ and then set full colour to ‘No Fill’.
9. The text box will now be transparent. You can simply type in the relevant pupil name and alter the size etc. of the font to suit your needs.
10. You can add more labels on the page in the same way.
10. You can add more labels on the page in the same way.
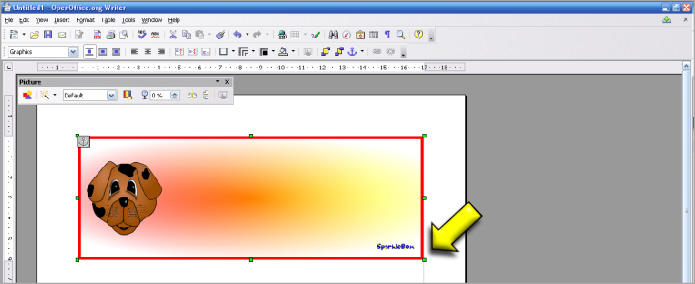
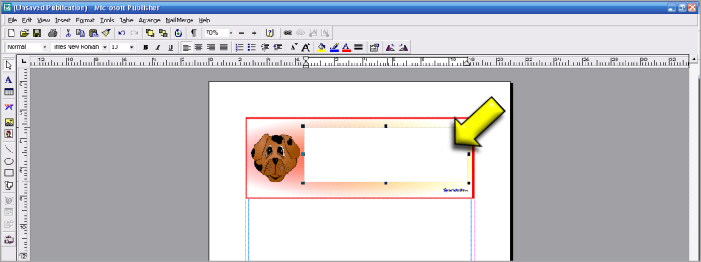
6. Click on the image and use the ‘handles’ (indicated by the yellow arrow above) to resize the label image to the size you want.
7. Next, click elsewhere on the page (anywhere but not on the label image) and then click the ‘Insert’ menu. Select ‘Frame...’ from the menu.
8. From the box that appears, click the ‘Borders’ tab. Then make sure that the Line style is set to ‘None’.
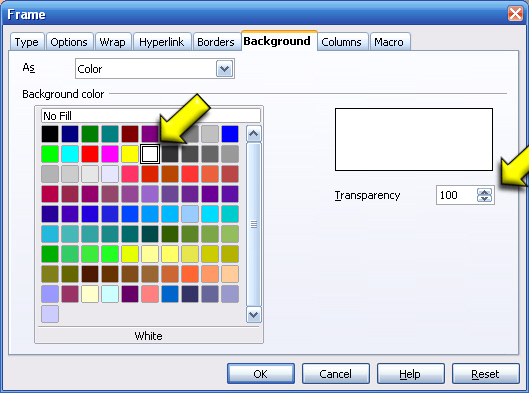
9. Now click the ‘Background’ tab and click the white colour and change the transparency to ‘100%’ by typing 100 in the box (see below):
7. Next, click elsewhere on the page (anywhere but not on the label image) and then click the ‘Insert’ menu. Select ‘Frame...’ from the menu.
8. From the box that appears, click the ‘Borders’ tab. Then make sure that the Line style is set to ‘None’.
9. Now click the ‘Background’ tab and click the white colour and change the transparency to ‘100%’ by typing 100 in the box (see below):

10. Click OK and you will notice that a ‘transparent’ text frame will have appeared. You can move and alter the size of the text frame to the correct position/size by clicking the very edge of it.
11. Once the frame is in position, simply type in the relevant pupil name and alter the size etc. of the font to suit your needs.
12. You can add more labels on the page in the same way.
11. Once the frame is in position, simply type in the relevant pupil name and alter the size etc. of the font to suit your needs.
12. You can add more labels on the page in the same way.
How do I add text above label backgrounds?